First lets define what a get-home bag is … it is the gear you need to get you home in case of an emergency (but mine is designed, outside of food and personal documents, to last me forever away from home in the event I couldn’t return to home for some reason. It is also designed that in case I do get home and for whatever reason home no longer exists, that I can survive indefinitely on the gear I have on me once I secure additional food.). Home from where? Home from wherever you are when you need it! So while reading this, think about how you travel. Do you normally drive, take a bus, a cab, uber, fly in a plane, etc?
What Types Of Emergency
That emergency could be many things: it could be your car has become disabled due to mechanical issues; it could be that inclement weather keeps you from getting home (a tornado has touched down and the roads are not passable, a hurricane is coming and traffic is at a standstill); it could be some national emergency (terrorist attack, biological hazard, civil unrest, protest that has turned violent); it could be a train derailment; it could be due to a mass shooting; maybe the roads are flooded, it could be a wildfire, etc. Wouldn’t it be so much easier if we knew exactly what we were preparing for and exactly when it was going to happen, and exactly what we needed to get home? Obviously if you are passing between urban and rural areas that will dictate different gear than just one or the other. A get-home bag is usually the necessities to get you to your place of residence where you have a larger kit, like the 72/96 hour kit, from wherever you currently are. Your get-home bag should be relatively small so that you can move fast and potentially for long distances over hours or days. If you are almost always traveling less than 5 miles in a urban area from your office to your home you can probably knock that out in a couple of hours assuming you don’t have to detour around some obstacle or disaster. If you have to detour, that 5 miles could easily grow to 15 or more miles. If you are normally traveling 5 miles in a mountainous rural area, that may take the better part of a full day depending on your fitness level and the route you take (primary/secondary roads vs trails vs bushwhacking). Likewise, the distance you travel will also determine what calorie and water requirements are needed also. If you are traveling more than 10 miles urban/rural, that may take more than 1 full day and not only do you need to account for calories and water, you now need to think about staying awake or taking longer rest breaks … aka camp.
How Far Can I Walk In A Day
This is going to vary person to person, by your fitness level, by the terrain, and by any obstacles or detours you may come up against. A note about fitness level, you can be a gym freak and still be challenged while carrying a backpack with gear. In terms anyone can understand, if you are not carrying your gear on your back for multiple hours a week, your body is not going to be used to that and you will struggle even if you are in tip-top shape. How do you overcome that? You do practice runs with your full gear load-out 2-3 times a week every week, just like going to the gym. From my experience hiking, during the off season if I toss a backpack that I normally use for long distance ultra-lite hiking (less than 10 lbs base-weight) on my shoulders, 10 miles is a rough day. But by the end of a long distance hike, I have increased my mileage to 30+ miles a day and if I walk all night too I can extend it out to 40+ miles, give or take, with a full resupply. Also, for another example, when I initially start a long distance hike, I may be burning 500-800 calories per hour for the first 3-7 days and then it will drop down to 200-300 calories per hour. Don’t use those calorie expenditures to determine how much food you need in your pack, you won’t want to eat very much during an emergency and you won’t have time either.
Kit Design
Every kit I design is based on the 10 c’s by Dave Canterbury and also uses the Rules of 3 as guidelines (for both of those in-depth, see the preparing for emergency article. The reason i use that system is after many years of doing long distance hiking, I realized his system fit perfectly into that gear and that made it tried and true and it also made it so I didn’t really have to learn anything new … basically the gear I use for long distance hiking is the type of gear I need in a survival kit … it just needs to be more rugged. If you don’t know what long-distance hiking is, that is walking hundreds to thousands of miles with nothing more than what you can carry on your back. I talk about the 10 c’s, rules of 3, and some other terms in the 72/96 hour kit article here. If you aren’t familiar with those terms, you should check out that section of the article and then come back here.
Questions and More Questions …
The first thing you need to do is think about your surroundings. Are you working in a large city and living in the burbs? Do you work in a small town and live in a rural area? How much distance might you need to travel? Are you in shape or out of shape? What are your survival skill level (do you know at least 3 different ways to start a fire when wood is wet? If you only had 3 trash bags and a knife, would you be ok for an overnight camp?) The average person can walk at about 2 – 3 mph over long distances but someone who is out of shape will need to take a lot of breaks or walk slower. Under ideal conditions (flat level land), that means a person should be able to walk 20-30 miles every 10 hours but it never seems to work out that way. Also the terrain may cause you to walk faster or slower. Walking on hot asphalt on a hot summer day is not as easy as walking through flat meadows on a cool day in the shade. Also if you are walking in unfamiliar territory you may walk slower as a precaution. If there is snow on the ground that might increase your travel time by 2 – 4x or even more. Will you be walking the same route you normally drive or are you taking shortcuts over peoples private property (and they may not like that)? Tall people have longer strides than short people and they also use less energy to travel the same distance because of that. Will you be so far away that you might need to camp or rest? Will it take multiple days to reach your home? Is the clothing and shoes you are normally wearing sufficient for long periods of walking (this is especially true for people who work in offices)?
What Do I Need in a Get Home Bag?
With hopefully several of the questions above answered, you can formulate what you might need in a get home bag. Two trains of thought: 1) the more skills I possess, the less gear I need to have on me. 2) I’d rather have gear I can ditch if not needed than to be without gear I might actually need. For people who work in an office, you will probably want a change of clothing that matches the season and sturdy shoes/boots in addition to your “other gear”. Most everybody needs a change of clothing simply in case the clothing you are wearing gets wet. Figure out what gear you may need based on your experience level, buy it all, then match your gear to the size of the bag you need. Do not buy a larger backpack than you need because humans have a tendency to want to fill up the dead space with unnecessary items that increases the weight of the pack. Usually you don’t carry a tent-style shelter in a get home bag. Tents for the average person are heavy and ultralight tents that weigh about 1 lb are very very costly. If you read my 72/96 hour kit you can probably tell I am not a huge fan of tents because tarps work tremendously well in emergencies and they have multiple uses. What I would suggest in a get home bag to keep the weight down is a military style poncho which is multi-purpose and can be made into a tarp or go the diy method that is super lightweight and carry 1 or 2 55 gallon yard waste trash bags and a roll of duct tape with some cordage. 1 55 gallon yard waste trash bag can be cut and made into a tarp while the other can be stuffed with leaves to provide ground insulation and stop conduction heat loss (your warm body at 98 degrees to the colder ground).
I try to keep it as simple as possible and as light as possible but I am also one of those people that go with the second train of thought – i’d rather have gear I can ditch if not needed than be without gear I might actually need. I mean yes, I could get rid of my shelter and sleep system and just use trash bags but there is a level of comfort knowing I have options and choices. As an example, if I know its going to take me 2 possibly 3 days to get home and the weather is clear skies and no forecast for rain and the overnight lows are mid-60’s and I know there are no emergencies at my home (my home will still be there when I get there), I can simply leave several bulkier pieces of my gear behind and go back for it later. I seldom travel more than 40-60 miles from my home unless I am going hiking and when I am hiking I have gear sufficient enough to live forever sans food resupplies. Therefore my get-home bag is made to last 2-3 days and covers a variety of possible situations, compliments my every day carry (cell phone, keys, wallet, firearm, pocket knife, lighter, polar vantage watch, a leather belt (not always but I keep one in my vehicle), boots (not always but I keep a pair in my vehicle)), is modular (when I get home, I pull the modular fire kit, cordage, and electronics out because each are stored in their own case …. add it to my the larger kit – which is really only a slightly larger tarp shelter, more food, seasonal clothing, documentation, and a trapping/fishing kit). Another thing, I have this kit pretty much crammed full but it doesn’t mean I am going to take all the gear with me to get home. As an example, lets assume my truck breaks down 15 miles from home at 10 PM and I don’t have any cell phone service. I may very well dump most of the kit and just take the bare essentials compass, map, rain poncho, water, some snacks so I can increase my speed and be home in 3-4 hours at a decent pace depending on terrain.
Although I have tried to be as thorough designing my kit for my needs, it may not fit your needs for your environment. This isn’t an article where you just print it out, buy the exact same thing, and make it work for you … i mean, it might work, it might fail miserably for your circumstances, i don’t know. I have pretty extensive experience in wilderness survival, wilderness first aid, edible wild plants, search and rescue training, among other survival training related to this topic and although I have never claimed to know everything, I am far more better off than someone without that training. I wanted this article to give you some ideas, how to make a really complete kit using high quality gear that was comfortable and relatively light weight so you can move faster. It also has a lot of overlap because I like options … as an example, from hiking long distances I know one thing is always certain, if you only have a tent there is no flat ground and if you only have a hammock there are no trees … I have literally had this happen to me. Yes, you can sleep on a slope in a tent but its not ideal and yes you can cowboy camp under a hammocks tarp but that isn’t ideal either. So my overlap in gear is first for redundancy (2 is 1, 1 is none) and second so I have more options and more options equals a better chance of survival! Also, I live in a very rural area and I am almost always in rural areas 99% of the time so my kit is more towards a rural get home kit. I do try to mask what my intentions are if I were to be passing through an urban environment by using some silly social-engineering tricks, i.e. it is a tactical grade backpack but its in the style of a hiking backpack without any visible molle or military-looking features….the addition of the sleeping pad on the outside of the kit makes you appear like a transient, hiker, or maybe a homeless person in a urban environment … so you become less of a target in an urban environment because those people are likely to not have much anything of value other than the gear on their back. If I was dressed all “tacticool” and all my gear was “tacticool” and I acted all “tacticool” then I am shouting I probably have some money, and some weapons, and some food, and some water, and some expensive gear that “tacticool” people have and I immediately become a target to someone that doesn’t have those things but wants them so being “tacticool” is a quick way to find yourself out-numbered. Even my weapon is hidden by simple placement of my arm over it. One more before I move on, if my life was different, i.e. I lived in an urban environment and I worked in an urban environment and I might have to travel a few city blocks or maybe a couple of miles, my gear would be totally “gray man” and probably fit in a book bag because I could make do with whatever was in my surroundings and I wouldn’t have to carry near as much (i could sleep in an abandoned building for shelter, I could get water from a tap or hose bib, I could get food from dumpster diving, i might only need 2 Bic lighters to start a fire from all the trash on city streets for warmth, and I could probably find a metal can or similar (steal a grate out of an oven) to use as a stove and another metal can or similar to cook food in or boil water to disinfect it, etc). The two closest urban environments or towns of any size at all for me are 24 and 27 miles away respectively … anything else for me is just single-street towns that are single crossroads so I don’t get those “make due with what you find” luxuries.
So now for the grand finale … my kit includes (from the 10 c’s categories):
Cutting
I carry a fixed blade knife, silky saw, and a multi-tool.
A fixed blade knife is the most important thing in your kit, no matter if you are in an urban or rural area. A knife can be used to make just about anything else you will need (but that requires time and during an emergency to get home, time is valuable). A knife can also be used for self defense; to build a shelter; to process firewood; to start a fire; to make traps; to clean game for food; to open food packages that no matter how hard you try you can’t open because you are weak from exhaustion and your hands are wet and oily; there are so many uses I could never name them all. Just know, having a good quality knife is the most import item in your kit, your survival will absolutely depend on it. The saw can be used for building shelters; processing firewood; making traps; self rescue (you are trapped by debris after a tornado or a tree is blocking an exit); etc. The multi-tool has way too many uses to list but immediately it has a backup knife; a backup saw; screwdrivers; can opener; bottle opener; various other bits you may need to make repairs to gear; etc. The knife and saw I keep in the water bladder pouch area inside the pack when I am not wearing the pack. I take the knife out and place it on my belt (which I am always wearing) when i put the backpack on, if it is feasible. There may be times when it is not (i just need to run NOW) but I can do it at a later time. I do always carry a smaller knife as part of my every day carry (and it varies just like the fixed blade knife – but some of my favorites are a smith & wesson black ops; an old timer 40T; a case Damascus steel seahorse whittler; victorinox one-handed trekker; or a victorinox hunter). The multi-tool I keep stored in one of the hidden woodsman possible pouches for later retrieval. The knife may not always be a Morakniv Bushcraft Black, it can often be whatever flavor of fixed blade knife is my favorite that week (i often alternate between several different ones). Sometimes I include a neck knife too (right now I have the Tops Brothers of Bushcraft fixed blade knife with a different ferro-rod inside of the Tops dangler sheath along with the Tops MSK2.5 neck knife stored in its sheath inside of the misc hidden woodsmen possibles pouch). I listed the Morakniv Bushcraft Black because I own several of them and I feel if you don’t have a fixed blade knife, it is one of the best first fix blade knives to own – its a whole lot of bang for the buck and it includes a fire-steel and knife sharpener; a razor sharp and easy-to-maintain blade that already has a 90 degree spine for throwing sparks on a ferro-rod. Mora also makes a neck knife too that would complement it well if you wanted to also have a neck knife (funny story, when neck knives first were getting popular I swore I would never own one because I didn’t see the benefit of a short stout blade … now I am many of them. They are really good for fine, controlled, intricate details whereas a fixed blade full size survival knife is great for slicing, dicing, chopping, and bulk wood removal during carving). I sometimes swap out the Leatherman Charge TTI for the Leatherman Style CS or sometimes the Victorinox One-Handed Trekker but the Charge TTI is way more versatile with a lot more tools. And while we are on knives, again not listed below, but I own both the flexcut carvin jack and the old timer splinter carver version of it too (if you decide this is something you need or want, get the flexcut, it is way way way better in quality steel, stays razor sharp longer, and has locking blades that the old timer does not have). A warning about the Tops Brothers of Bushcraft knife, it does not have a 90 degree spine and you will need to know advanced knife handling/sharpening skills in order to use this knife with a fire-steel. You are much better off sticking to the Mora Bushcraft Black and maybe adding the Mora Eldris neck knife if you don’t already own a fixed blade knife. Both Mora’s are excellent knives, razor sharp, hold an edge a long time, a lot easier to use, both include fire-steels, and both have 90 degree spines already … ready to use for survival out of the box imho.
or Optional or
Combustion
Bic lighters / Ferro-rod / DIY Cottonball Fire-starters / Chapstick / 1 x 9 hour candle / Possibles Pouch / Pocket Bellows / Magnifying Glass / Flint + Steel
Having the ability to create fire is extremely important to survival, so important that combustion is the 2nd category in the 10 c’s – if you have ever watched any survival shows on television, that is usually the first thing they set out to do (because they usually always have a knife). Why is fire so important? With a fire, you can cook a meal; you can get warm; you can boil water to purify it; you could use the fire as a signal for help (with that being said, a fire can also give your location away if you don’t want help); you can use a fire to dry your clothes; you can keep animals/bugs/predators away; and the reason why everybody always makes camp fires when camping is because fires are also a moral boost/relaxing. My fire kit is stored in a hidden woodsman possibles pouch inside of a fieldline pouch I bought years ago from Walmart. Then with the space left over inside the hidden woodsman pouch, I keep my sawyer water filter and extra water bag. The magnifying glass I removed from the metal frame and it is stored in one of the admin pouches of the fieldline pouch. I usually have a total of 3 Bic lighters (one on me, one in the fire kit, one in the first aid kit). It is highly unlikely I would lose all 3 at once. I use pre-made cotton ball fire-starters by putting Vaseline in a Ziploc bag and adding the cotton balls (you could also use dryer lint too). In the event I would lose all of the cotton balls or misplace them, I could scrape cotton material off of my clothing or one of the cotton bandannas mentioned below and use Chapstick instead of Vaseline. Another option would be to use the candle in place of the cotton balls + Vaseline. Another option if it is sunny is to create fire using sunlight with the magnifying glass and save the Bic lighters and cotton ball fire starter for another rainy day. If I did lose all 3 Bic lighters, I also have a fire-steel/ferro-rod. Finally, the pocket bellows makes it very easy to focus air/oxygen from my breath onto a fire to help it grow quickly (if you have ever spent any time outdoors, I am sure we have all blown on an ember to try to get a fire going again and most of the time that air goes everywhere except where it needs to go … that doesn’t happen with the pocket bellows). So with this fire kit, you have multiple ways to start fire and you have multiple backups in case one doesn’t work or there is inclement weather or you need to conserve your supplies and its a nice clear sky day with a bright sun that you can harness to start a fire using the magnifying glass. I carry an ESEE steel and english black flint with some char clothe. My flint+steel kit I put together individually and a lot of it outside of the esee fire steel i made myself. I only mention it because I know it will be in the upcoming fire kit video and If I don’t mention it, people will comment and ask why. I am not sure of the quality of the steel used on the kit listed below but you could buy a kit and save a few bucks over buying them individually (it also has a pocket bellows included with it so one less item to buy from the list below), it does have decent amazon reviews. Do you have to have a flint+steel+char cloth kit in your get home bag? Probably not so I will leave it up to you. It is a good skill to know. There is also a spare ferro-rod or two almost always. Why two spares? Well, the one that came with the Tops BOB knife is kind of unique compared to a normal ferrocium rod in that it is a combo-metal, magnesium plus ferrocium and it has a cool whistle that kinda sounds like a train lol. Then I also have a larger Bayite 6″ x 1/2″ that is sometimes easier to use in cold / wet weather due to its size. Again, you may not need all of these, but I like options and sometimes I just have them around to sharpen skills using other fire starting methods. Believe it or not, there are many other ways to start fire in non-conventional ways, i.e. fire piston and numerous friction methods that I don’t keep in any of my kits. Again, those are skills to know but I think the kit I have put together is pretty in-depth and should cover pretty much any emergency short or long term.
You can see an overview of my fire kit on youtube here
Cover
Rain Poncho / Swagman Roll / Gloves / Beanie / Sleep pad / tarp / Optional Boonie Hat.
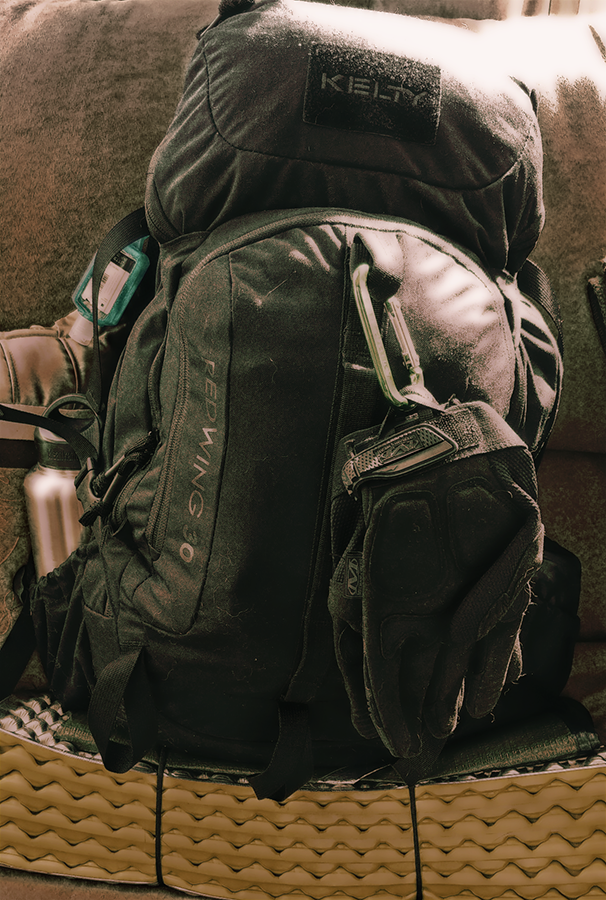
The grabber blanket (used as a tarp) and sleep pad are attached to the Kelty Redwing 30 tactical backpack to the bottom of the pack using 550 paracord and canadian jam knots. The poncho is stored in the top lid of the Kelty Redwing 30 tactical. The Swagman roll is left in its stuff sack in the bottom of the main backpacks compartment inside of the 20L drybag. Some notes on the swagman roll: this thing is awesome and multi-purpose by design. It can serve as a woobie liner for the rain poncho providing extra insulation; you can also zip it up into a rectangular sleeping bag setup; you can also use it as a hammock; and finally if your clothing got wet, you could simply wear the swagman roll as your clothing until it dries out. It is water resistant but not water proof. The gloves are attached to the outside of the pack using a carabiner. I own several different styles of Mechanix gloves and at first I hated the m-pact models which have a almost rubberized texture on the outside knuckle area. They were designed for law enforcement/military hands-on engagements to displace some of the “impact” to reduce injury. Over time though they have grown on me and well, here they are. Depending on the season, I sometimes have a beanie or a boonie hat. In the spring-fall the boonie hat is awesome for keeping rain off of you and also providing some relief from the sun and it can also provide just enough insulation for cool nights to keep you warm.
Container
Backpack / Backpack Rain Cover / Kanteen / Filter / Water bag / Stove & Cup / Esbit tablets / Spork / Dry Bag.
The kelty redwing tactical 30 liter backpack is like a hiking backpack but made out of tactical style material. It has all the features and comforts of a hiking backpack with tactical strength (unless you have owned a LOT of backpacks, this might not make sense to you but lets just say there is a huge comfort advantage over hiking backpacks vs currently available tactical backpacks – I touch on some of those reasons in my “family preparedness” article but the quick highlights are — most tactical backpacks on the market that resemble military style backpacks are limited in space, are overly heavy, overly priced, and do not provide enough lumbar support to keep you from feeling like you have been run over by a truck after rucking around with it on all day. The shoulder straps are often made out of thin material, they do not have load lifters or adjustments for torso length, and if they have a frame it is usually not very comfortable. Most of them expect your shoulders to carry all the weight whereas hiking backpacks have all of those things and more plus they place the load of the pack on your hips. Current tactical backpacks are like comparing “paintball gear” to military gear imho and they have a long ways to go before they catch up with the likes of kelty or osprey that make backpacks that can easily ruck around 60+ lbs for 20 hours a day comfortably.). The Kelty Redwing Tactical backpack is wayyyyy more comfortable than any of the 20 or so tactical style backpacks I own by many different manufacturers such as 5.11, Condor, SOG, Snugpak (i own about 30 backpacks in total, some are task specific and some I bought to try out and never liked for whatever reason (almost always comfort vs load capacity related) – I have always been on a search to find something comfortable after wearing it all day, able to carry heavy loads over great distances, that won’t wear out or fall apart in a year or two).
How do I pack the backpack? The main compartment of the backpack from bottom to top has the swagman roll in a dry-bag, the 3 possibles pouches shoved to one side, the prybar stuck down the open air space next to the possible pouches, then the food bag on top. The swagman roll is uncompressed so you have to squash it all down to get the zipper on the top lid of the backpack to close but trust me, there is still plenty of room if you wanted to compress the swagman roll using compression straps (i leave out because its just unnecessary weight). In all honesty, there is enough room for a change of clothing for most people. I store the klean kanteen on one of the outside side water bottle pockets and I store the solo stove with 6 esbit tablets inside the cup on the other side. In the secondary outside pocket I store the first aid and trauma kit along with the backpacks rain cover. In the top lid pocket I store the poncho. This setup allows me to quickly get the poncho on me if it is raining and also grab the backpacks rain cover…2 zippers and less than 2 minutes time. I actually have two of the sporks, one is stored with my food kit and the other is inside one of the hidden woodsman possibles pouches. There are 2 reasons for the 20L dry-bag … 1 is if my clothing gets wet, I don’t want to have wet clothing in the backpack if I am on the move which would compromise my sleep system (plus the swagman roll is my backup clothing). So i could shed out of my clothing, place the wet clothing in the dry bag, strap it to the outside of the backpack using carabiners until I can get to a place where I can get it dried by a fire or get home and toss it in the washer. You will notice in this document there is not a lot of extra clothing, that’s because if I needed to shed my clothing I still have the rain poncho and the swagman roll I could wear over my butt naked body. Also, I usually dress the weather so that means in wintertime I have the clothing I may need and then some and I can always wear or take off more or extra layers. Second, even though the swagman roll is water resistant, I didn’t want to take a chance of it getting wet if there was some reason there was a delay getting the backpack rain cover on. Not only that, but the dry bag is multi-purpose, is pretty lightweight (thanks to my research I must have bought 20 different dry bags before I found this one a few years ago), and outside of the reasons I already mentioned, it can also be used to carry a large amount of water or any edibles I happen to find like nuts, berries, fruits and since it has heavy d-rings, I can simply use a carabiner or paracord to attach it to the exterior of the pack. A secondary carry option with the d-rings at the top and a heavy-duty carry loop on the bottom of the dry-bag is that I could fashion straps out of paracord to make a makeshift backpack (i could stash or hide the main pack while exploring for edibles or similar using the dry-bag and only basic necessities with me)
Cordage
Nite Ize / Tarred bank line / 550 paracord / hidden woodsmen possibles pouch / gorilla tape
Some people carry only 550 paracord or some people only carry bank line and honestly I can’t think of a single person on YouTube that has ever mentioned nite ize cordage that was reviewing goto bags, get home bags, bug out bags, etc. Its like my best kept secret. Why do I like it so much? 50 feet only weighs 2 oz so it is stronger than #36 bank line and lighter too. It is reflective so its not the best choice for some covert camp. Again, I like choices so I usually carry 50 feet nite ize, 100 feet approx bank line, 50 feet 550 paracord. I usually also have a shemagh, bandanna, and cool cap in here also (that is listed under cotton bandanna). The duct tape can be used for many purposes. The nite ize cord I use as a ridgeline for a tarp shelter using either the helikon rain poncho or the grabber blanket (usually the grabber blanket that way I can use the poncho as an extra layer of clothing). I have 2 small loops about 6-8 inches of 550 paracord pre-made to use as prusik knots on the ridgeline, this allows me to set up a shelter in less than 1 minute. The paracord really bites hard onto the nite ize cord.
Candlelight
Olight M2R Warrior / Olight Hr1 / Spare CR123 Battery / Spare 18650 battery / Candle
The Olight M2R Warrior flashlight is mostly used for non-lethal defensive purposes. At 1500 lumens on high, nobody can attack you if they can’t see you and that give you time to retreat or stand your ground. It is attached to the outside of the backpack on the left side waist strap and has a rechargeable battery. I keep a spare rechargeable battery in a dual 18650 battery case inside of the “electronics” hidden woodsmen possible pouch. The Olight H1R headlamp (video review below) I want to be available quickly so it is simply attached on the outside of the backpack on the heavy grab handle. I love this headlamp and have done 2 long distance hikes using it and countless weekend hikes. It gets great battery life! I usually keep it on the 2nd from lowest power level most of the time even when night hiking but it also has the ability to be insanely dim (think covert reading) or insanely bright (think you just heard a bear running through the woods) for its size at 600 lumens. It has 5 different strength levels plus strobe/SOS. There are two spare non-rechargeable CR123a lithium batteries also stored in the 18650 battery case in the “electronics” pouch. In a pinch, the 2 x 123a batteries could also power the M2R tactical flashlight or the H1R light for up to an additional 100 hours of usage. Assuming all backup are discharged, in the electronics kit I have a usb battery and I keep a small but powerful solar panel in the backpack so I can recharge either of the flashlight batteries. When doing long distance hiking I was getting around 50 hours of usage out of the rechargeable battery and slightly longer out of the energizer 123A lithium batteries I carried as spares. The last long distance hike I did, I only took the 1 rechargeable battery and two spares and that lasted 3 full weeks. The candle can be used as light or for starting fires. I keep them with the fire kit since that would be its primary intended use.
Cotton Bandanna
Shemagh / 2-3 Cotton Bandanna
The shemagh and cotton bandanna’s may vary in color because I have several different ones. There is almost always a cotton “cool cap” from Walmart in there too (in sporting goods by the camping gear they usually have them). They are like a bandanna but are pre-tied to use as a cap on your head. They have some sort of jel material in the top of them. When you wet them down in a stream or from sweat, they really help you to cool down from the heat transfer from your head to the damp jel material…they are really amazing and I have used them on numerous long distance hikes and many hundreds of shorter hikes. The very first “cool cap” i bought is still going strong after thousands of sweaty miles but it is starting to show its age. On a visit to Walmart about 3 years ago, I just bought every one they had on their shelves because I like them so much. They are also multi-purpose in that if they are dry you could use them to keep your head warm. And if you needed to sacrifice something to make char cloth, they are also 100% cotton like a bandanna. Why so many bandannas? Gosh, there are about a million uses of them so let me cover some: you could use it to make a fire in an emergency; you can use it as a pot holder or to grab something hot; if you didn’t have gloves and your hands were cold you could use two of them as gloves or added insulation for your hands or feet; you can make a splint with them; you can use them in place of gauze bandages with duct tape; you can wet them and place over your neck to keep from getting sunburned; you can place them over your head to provide some UV protection and keep you cooler; you can make a chair using 3 sticks as legs and the bandanna as the seat; you can use them as a make-shift pillow; you can use them as a wash clothe; you can use them as washable toilet paper; you can use them to wipe sweat off your face; etc. So I generally have 3 different colors where 1 is a wash clothe, 1 is a potential poo rag, and 1 is kept as clean as possible in case I have an injury. Women will almost always use one specifically as a “pee rag”. A shemagh is just a very over-sized bandanna and can be used the same way. These are stored along with my fire kit in a hidden woodsmen possibles pouch.
Compass
Compass / Pace Beads / Map / Garmin 64S
I have a couple of different high quality compasses and like knives, I carry whichever one is my favorite that week. However, the suunto is the only model I own several of the same model. The pace beads are useful for keeping track of approximately how far you have gone (if you know how to use them). The pace beads are used in conjunction with the compass, often for rerouting courses or estimating distance on longer bearings (plus its an excellent way to keep your mind off of whatever the emergency is by counting steps you take). The map gets stored in the water bladder area of the backpack. I could cut down considerable weight by simply scanning the map parts I need but how do you know what map parts you will need or when an emergency will be? This map in particular is slightly wider than the opening so it creates some open space as it starts to bow which is just a perfect place to also store the saw, fixed blade knife, and solar charger when they are not in use (and they come out really easy because of that space). I often also carry a Garmin 64S GPS too stored in the electronics possibles pouch when not in use. I usually attach it to the outside of the pack right before I put the pack on though. It’s not to help me get home or for providing direction although it can be used for such but I carry it with me almost everywhere for a specific reason….I have several years of edible food resources marked on it (which I first started doing 7-8 years ago using a Garmin 62SC GPS and I simply transferred the tracks and way-points to the new GPS), i.e. lets say its spring and I am hiking in the woods and notice a plum tree in bloom – I mark its way-point on the GPS with any notes that might be helpful (height, health, etc). If I find a hot spot for morel mushrooms or similar I mark them also. Caves, ditto! Water sources, ditto! Terrain that may not match a topographic map, ditto! I have even stopped while driving down the road and marked apple trees on private property with notes like – 75 foot apple tree with heavy blooms approx 100 feet northwest of this way-point. So you get the picture, when the zombie apocalypse happens, I know where all the natural food is for various seasons along with features of land that might come in handy some day 🙂 In an emergency, lets say its civil unrest or a riot or something, I might mark way-points for buildings that look empty, roads that are blocked, or other similar points of interest. If I decided to hunker down, I might also use the GPS to find my way back to that location if it was a good spot. This model of GPS also has rechargeable batteries and this model of GPS also allows you to recharge those batteries using a USB battery provided you make a simple hack to the batteries first … and that is wrap the pair with a single layer of duct tape so it engages the “this GPS is using official Garmin rechargeable batteries button” and the “recharge via USB feature” is then enabled.
First Aid + Sanitation
Small First Aid Kit / Trauma Kit + Tourniquet / Misc Sanitation Items
I linked to a standard first aid kit that I feel is sufficient but I made my own. The ever ready trauma kit is awesome. It has a lot of quality trauma kit items in it, and plenty of room for more. It would absolutely suck if you were trying to make your way home and cut your finger off by accident and then bled out … so have a trauma kit and know how to use it. I just can’t believe the number of bug out bags and get home bags I see without trauma kits….like accidents don’t ever happen. I don’t know what kind of world those people live in, but I know for a fact accidents always happen when you are in a hurry and under stress. So be prepared to deal with it. I actually store my sanitation, smaller first aid kit, toothbrush kit, body glide and a small travel bottle of monkey butt powder in there. I add to the smaller first aid kit a Bic lighter, a travel tube of Advil, Imodium AD, and Chapstick (Chapstick is under fire kit but i didn’t list those other items below on this page but it is on my other larger kit page). If you are going to have to walk a long distance you will want to have bodyglide and anti-monkey butt powder. Even men can get chaffing in places you don’t want to get chaffing due to sweat and skin to skin contact and body glide will stop that before you are barely able to walk due to your testicles are on fire. The powder is for your feet to stop blisters. Blisters only form because your feet sweat in your socks and this causes friction, so having powder to dry up that sweat in your socks stops blisters too (tip, no matter how much of a hurry you are in to get home, stop every 2 hours for 15 minutes and site down, remove your shoes and socks, add some powder to your feet, put shoes and socks back on. As crazy as it sounds, you will travel further faster even with these breaks – I’ve proven this time and time again when long distance hiking, it has something to do with giving the muscles a rest and reduces fatigue drastically plus gives you just enough time to take care of your feet so you can get home because without them or if they get injured, you aren’t going to make it). Mosquito wipes I keep just in case they are bad .. the trick with mosquitoes is just to keep moving since they attack more when you stop. A small toothbrush and toothpaste kit is also included because emergency or not, dental hygiene is still important. The hand sanitizer I attach to the shoulder strap of the backpack so its conveniently right there so you can sanitize your hands easy without taking the backpack off. The wet-wipes make an easy way to freshen up when needed (long distance hikers can take an entire bath using 3 or 4 of them and it really helps to cut down any body odors). Also, collect any trash from the tp, body wipes, insect repellent because guess what? That can be used to help you start a fire if you need it. I store the completed kit in the outside secondary back pocket of the backpack.
Misc
Water shutoff keys / Prybar Combo Tool / Anker Battery / Phone Cord / Misc Cords / Knife Sharpener / Solar Charger / P-38 & P-51 Can Opener / Rite In Rain Notepad+Pen+Case
The jones stephens key is a water valve tool to turn on water on commercial buildings that usually have the handles removed from water hose bibs. In an urban environment, that may be a way to get water. The pry-bar also has a water and gas shutoff tools but its more for search and rescue or fire department usage … I mostly keep it in the kit for the pry-bar feature (I’ve been waiting on the price of titanium pry-bars to drop but right now they are about $250 so I will just pack the extra weight of the one below because it didn’t cost me anything — it was included as part of either CERT or Search & Rescue training). All of the electronics (in this category or others) fit in a hidden woodsmen possibles pouch except the solar charger I place with the maps in the interior hydration bladder sleeve (did I mention how huge that hydration bladder sleeve is?). The pry-bar fits in the main backpack compartment in the dead air space that occurs when you shove all 3 possibles pouches to one side. The P-38 and P-51 can openers weigh nothing and what happens if you run out of food and need to restock and you just so happen to find a can of food … yes, you could open it and risk damaging the most important part of your kit (your knife) or cutting that finger off from sharp metal edges or you can spend a couple bucks and have two manual can openers. I store them in the misc possibles pouch along with the knife sharpener. The knife sharpener is here because I can’t stand a dull knife and what if I get home to a home that no longer exists? Since your knife is your most important tool and since I never know which knife I am carrying, I make sure I can maintain them in the field efficiently and effectively. The notepad, pen, and case are used to jot down notes or route planning or a multitude of other things….could even be used to help start a fire if needed.
Calories
Energy / Electrolytes / Coffee / Snacks / 2 Mountain House Meals / food bag / massive energy
I don’t use the complete 2 day mountain house kit. I basically keep around 6-10 electrolyte packets, 6-10 coffee packets, 12 energy packets, 2-4 protein bars, about 24 slim jim mini, and 2 mountain house dinners in the condor bag. There is also room for a spork. You can really fit a lot of food in this small bag and since it has Velcro hook and loop plus the buckles you can really cinch the size of it down pretty small. As a habit from long distance hiking, I also keep roughly 6 daily multi-vitamins (i double up the dosage to 2 a day to fool the body into thinking it is getting enough micro/macro-nutrients) and about 12 hydroxycut hardcore elite (which provides an insane amount of energy – I usually take 1 tablet every 4 hours if needed and these things can make you stay up a couple days in a row if you need to — do not take the full dosage on the bottle which is 4 tablets daily all at once or even in 1 day if you are not used to these. I’d recommend you take 1 tablet and wait about 6-8 hours first to see how your body reacts. I have known some people that take too much of this and their body decides to empty all stomach contents which won’t be good when you only have minimal food rations with you. You have been warned!).
Protection
The Olight M2R Warrior light can also serve as non-lethal protection, but part of my edc is concealed carry. I simply swap my edc carry holster for this one which fits better while carrying a backpack. Instead of having the holster appendix carry between my skin and pants, I have this holster between my pants and the backpack waist strap.
Some Notes On The Above
The biggest question you probably have is … what does all of this kit weigh? And I just weighed it using the same digital scales I use for my ultralight kit (its basically a travel scale made for suitcases) and the grand total for the complete load-out (water, food, both hats, all gear as listed) ….is only 28.0 pounds (the holster is empty). Like I said, I can take too much gear and shed some weight if I needed to but 28 lbs isn’t very much at all and this pack absolutely is rated well above a 30 lb load carrying capacity and it carries it very well and very comfortably.
Its almost always cheaper to buy in bulk from amazon which is why I always list the bulk packed items when I can.
Where should I Keep My Get Home Bag?
If you drive to work in your own vehicle, you should keep your get home bag in the trunk of your car where it is out of site of someone who might want to steal it. If you own multiple vehicles, you need to remember to swap the bag to the vehicle you are driving each day if it changes. Another option is to have the same kit in each vehicle. If you carpool or walk to work, you might keep your get home bag with you in your cubicle or locker or a break room. Same with other public means of transportation.
Leave a Reply
You must be logged in to post a comment.