I have been using cluster ssh on and off for some time now but I have never written about it. So first, let me tell you what my definition of it is……a huge time saver for multiple like tasks that need completed across many servers or systems.
As an example, lets say a critical update comes in and it affects 25 web servers, a lot of people will log into each web server, perform the update, log out, go to the next one, etc until completed. That’s a huge waste of time….assuming it takes 5 minutes to log in, run the update, log out, log into the next one….that is 25 x 5 or roughly 125 minutes, slightly more than 2 hours.
What if you could log into 1 server and update all 25 in 5 minutes? That is efficiency right there and I am a huge freaking advocate of it. The application I use is called clusterssh, or cluster-ssh, or cssh.
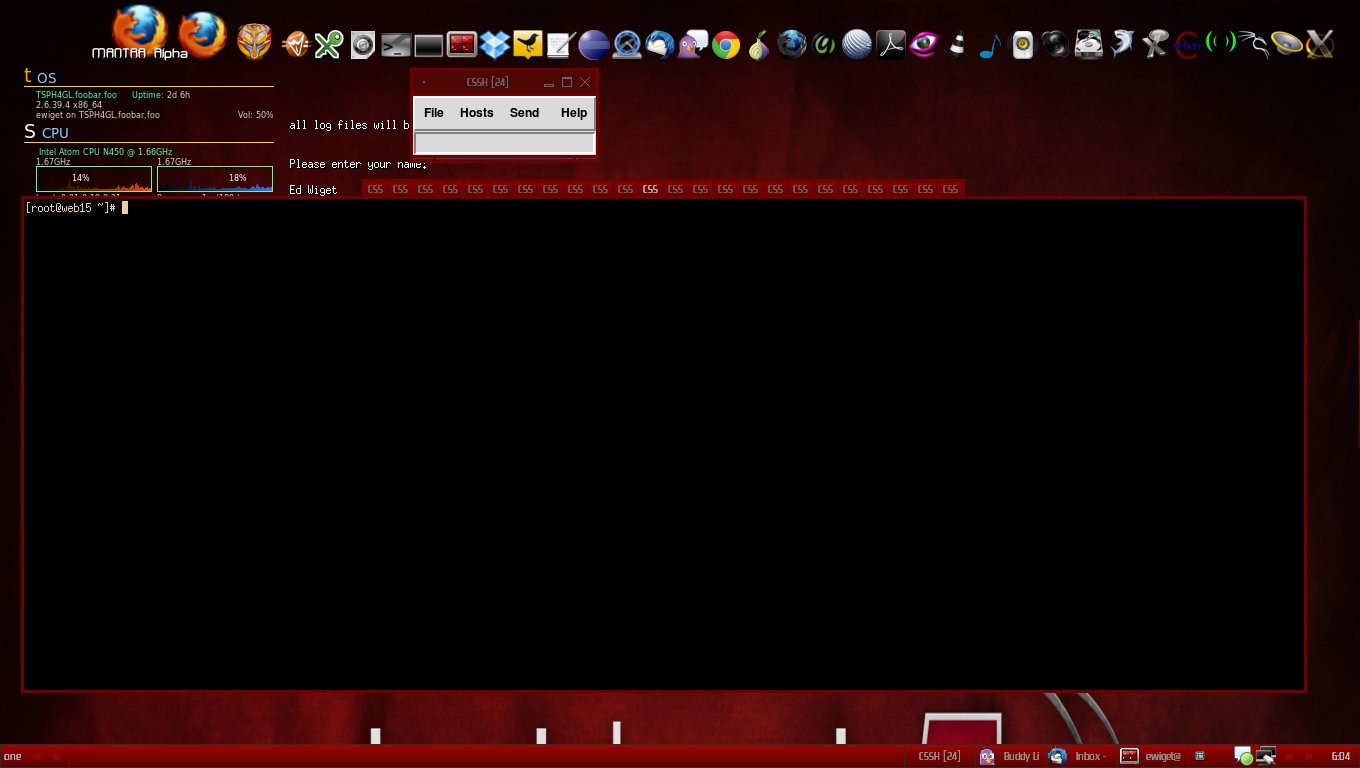
In the image above, you will notice my xterm is using a window of tabs with no decorations in fluxbox. This is a fluxbox config and I will cover it too, but for other window managers, running cssh will open each term in its own window…..and that can get really hectic for something like kde.
First, the fluxbox configuration that causes all xterms to open in tabbed mode.
Add this to your ~/.fluxbox/apps file:
[codesyntax lang=”bash” lines=”no” capitalize=”no” strict=”no” title=”apps” bookmarkname=”fluxbox apps file” doclinks=”0″]
  # Group all xterms into tabs
[group]
   [app] (name=xterm) (class=XTerm)
   # edit to your screen size (I usually set this a little smaller than my smallest resolution which is 1024x600 for my netbook)
   [Dimensions]  {1024 491}
   # I like it here.
   [Position] (TOPLEFT) {0 75}
   # Why not?
   [Alpha]   {190}
   # available on all work spaces regardless of Iconify
   [Sticky]  {yes}
   # optional - do not use [Hidden] or [FocusHidden]
   [IconHidden]  {yes}
   # set to be on top of everything
   [Layer] {2}
   # display only a tab and a border regardless of
   # window manager settings.  This looks nicer than
   # with all the window decorations.
   [Deco] {516}
[end]
[/codesyntax]
So the above works because I only use xterms for cssh. I use aterm, Eterm, terminator for other tasks. If you don’t separate the functions like this, you might not like to have each xterm open this way.
Now the cssh configuration. Open up ~/.csshrc. Mine looks like this:
[codesyntax lang=”bash” lines=”no” capitalize=”no” title=”.csshrc” bookmarkname=”cluster ssh csshrc config file” doclinks=”0″]
auto_quit=yes
command=
comms=ssh
console_position=
extra_cluster_file=
history_height=10
history_width=40
key_addhost=Control-Shift-plus
key_clientname=Alt-n
key_history=Alt-h
key_paste=Control-v
key_quit=Control-q
key_retilehosts=Alt-r
max_addhost_menu_cluster_items=6
max_host_menu_items=30
menu_host_autotearoff=0
menu_send_autotearoff=0
method=ssh
mouse_paste=Button-2
rsh_args=
screen_reserve_bottom=60
screen_reserve_left=0
screen_reserve_right=0
screen_reserve_top=0
send_menu_xml_file=/root/.csshrc_send_menu
show_history=0
ssh=/usr/bin/ssh
ssh_args= -x -o TCPKeepAlive=yes -o ServerAliveInterval=20 -o ServerAliveCountMax=3
telnet_args=
terminal=/usr/bin/xterm
terminal_allow_send_events=-xrm '*.VT100.allowSendEvents:true'
terminal_args=
terminal_bg_style=dark
terminal_colorize=1
terminal_decoration_height=10
terminal_decoration_width=8
terminal_font=6x13
terminal_reserve_bottom=0
terminal_reserve_left=5
terminal_reserve_right=0
terminal_reserve_top=5
terminal_size=80x24
terminal_title_opt=-T
title=CSSH
unmap_on_redraw=no
use_hotkeys=yes
user = root
window_tiling=yes
window_tiling_direction=right
clusters=cluster1 cluster2 cluster3 cluster4
cluster1=server01 server02 server03 server04 server05 server06
[/codesyntax]
The two important parts of the above config file is clusters= and cluster1=. Let me explain: Each cluster must have a definition of its name inside of clusters=. For this example, I used cluster1 cluster2 cluster3 cluster4. The names must be separated by white space. You can call them or name them whatever you want. They don’t have to be called cluster1 cluster2 cluster3 etc.
I usually name my clusters something similar to distro name or task, i.e. redhat might be the name of the cluster of redhat servers, apache might be a cluster name for all of the servers running apache, sendmail might be the name of a cluster for all servers running sendmail, development might be a name for a cluster of all development servers, production might be the cluster name for all production servers, etc. You can be as fine grained as you like.
Then each set of clusters must have a group of servers defined. I defined cluster1 as containing server01 server02 server03 server04 server05 server06. You can either use valid domain names, ip addresses, or host file entries in place of server01 server02 server03 etc. I chose to use host file entries, so inside my host file is an ip address that matches server01, an ip address that matches server02, etc.
I also use ssh passwordless authentication via keys……otherwise you should have a like password on each system because it will prompt you for the password. You should also use the same login name too (and set that name in the csshrc file)
Once you have the .csshrc config file set up, you can test it by simply running the command:
[codesyntax lang=”bash” lines=”no” capitalize=”no” title=”command to run:” doclinks=”0″]
cssh cluster1
[/codesyntax]
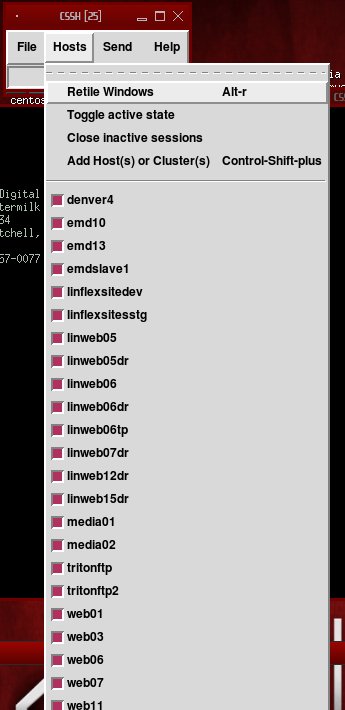
The above command will then open all of the cluster1 servers defined in the file. Typing a command into the smaller window above the xterm types the exact same command across all of the clusters at once. If you need to run a command on only one of the clusters, click on and highlight its tab in the xterm tabs, this allows you to run a command on only that server. If you want to disable, for example, 4 servers but run the same command on the others, the cssh window has a Hosts drop down menu, pictured below, where you can enable or disable hosts as needed.
So, the next time you have 25 servers to perform yum updates on…..do it in one shot and then kill almost two hours doing something else. 🙂


Leave a Reply
You must be logged in to post a comment.